Showing posts with label Historicals. Show all posts

Tuesday, April 23, 2019

Ambuscade Photo Dump

I've not had much chance to do gaming this month, so here's all the photos I took at this year's Ambuscade. Very pleasant day of gaming.


Saturday, January 12, 2019

Game Night: Black Powder 2, Napoleonics

Gaming at Andrew's after a long hiatus! Pete put on a nice game of 100 Days French vs. Allied with classic 25mm figures, using the new version of the Black Powder rules. I was granted command of the French right, which included the Guard and a division of cavalry.

Thanks to some command failures on both sides, the game developed primarily on the flanks. On the French left, a wood blocked free movement and became the chief battlefield. In the center, French infantry moved slowly up toward the defensive positions the British had seized - some houses and walled fields. On the left, the British heavy cavalry - the legendary Scots Greys - pelted up and seized the initiative. They were quickly met with a charge of French heavy cavalry, which pushed them back. A subsequent charge from the French, however, cost the French one unit of heavy cav and badly bruised the second unit. The Guard meandered on up at a walk, their only contribution being some cannon fire. 

The central French infantry regiments pushed up and evicted the British light infantry from the walled field. Then the Scots charged forward and retook the field, and a ferocious scrum ensued, eventually ending when the Swiss pushed the Scots back and a French line unit annihilated the rifles.

Finally, the French infantry reached the Brunswickers and the Brits holding the defensive line. The light cavalry made a daring but foolhardy charge at the British heavy cav, and succeeded in breaking them - but in the process, were too damaged to stay on the field themselves. Both divisions began to retreat. The Guard began to move up, but it was too late. The French center-right division and far left division both broke as well, along with another British division, and so the game was decided - barely - in favor of the Allies.

View from the French right of the advancing British and Brunswickers.

French cuirassiers and carabiniers charge at and are countercharged by the Scots Greys.

Turn 2ish, overview. Cavalry action on the French right near the camera, 95th Rifles in a field but disordered in the center, and the British left getting bogged down on terrain to the far right.

View of the French center.

Scots Greys retreat in good order, holding the British left. Behind the road and hedge the Brunswickers are awaiting the French.

Over on the French left, French line infantry skirmish with British line in the woods.

French heavy cavalry charge in on the Scots Greys again - but their supporting light cavalry failed the command roll, and so they must fight alone.

British cavalry charge in around the woods, braving French musket fire.


Checking for support in a cavalry melee on the French left.

The penultimate round: French infantry have pushed up the center but are held at bay by Scots and Brunswickers. On the French left, near the camera, skirmishing in the woods dominates the action, preventing the British from moving toward the French line. On the French right (top of photo), the Scots Greys have intimidated the French cavalry severely, destroying one unit, but have taken quite a bruising themselves.

The final state of things. The French are in retreat, half their divisions having broken. The Allies have fared only marginally better, but they hold the day.


Painting update

I'm about 1/3 of the way through the samurai. Been distracted by some D&D figures for a campaign that's just starting up...

Budget update

Spent about $30 out of my $100 budget so far, on primer and paints.

Sunday, January 29, 2017

Battle Report: Battle of the Hydaspes River

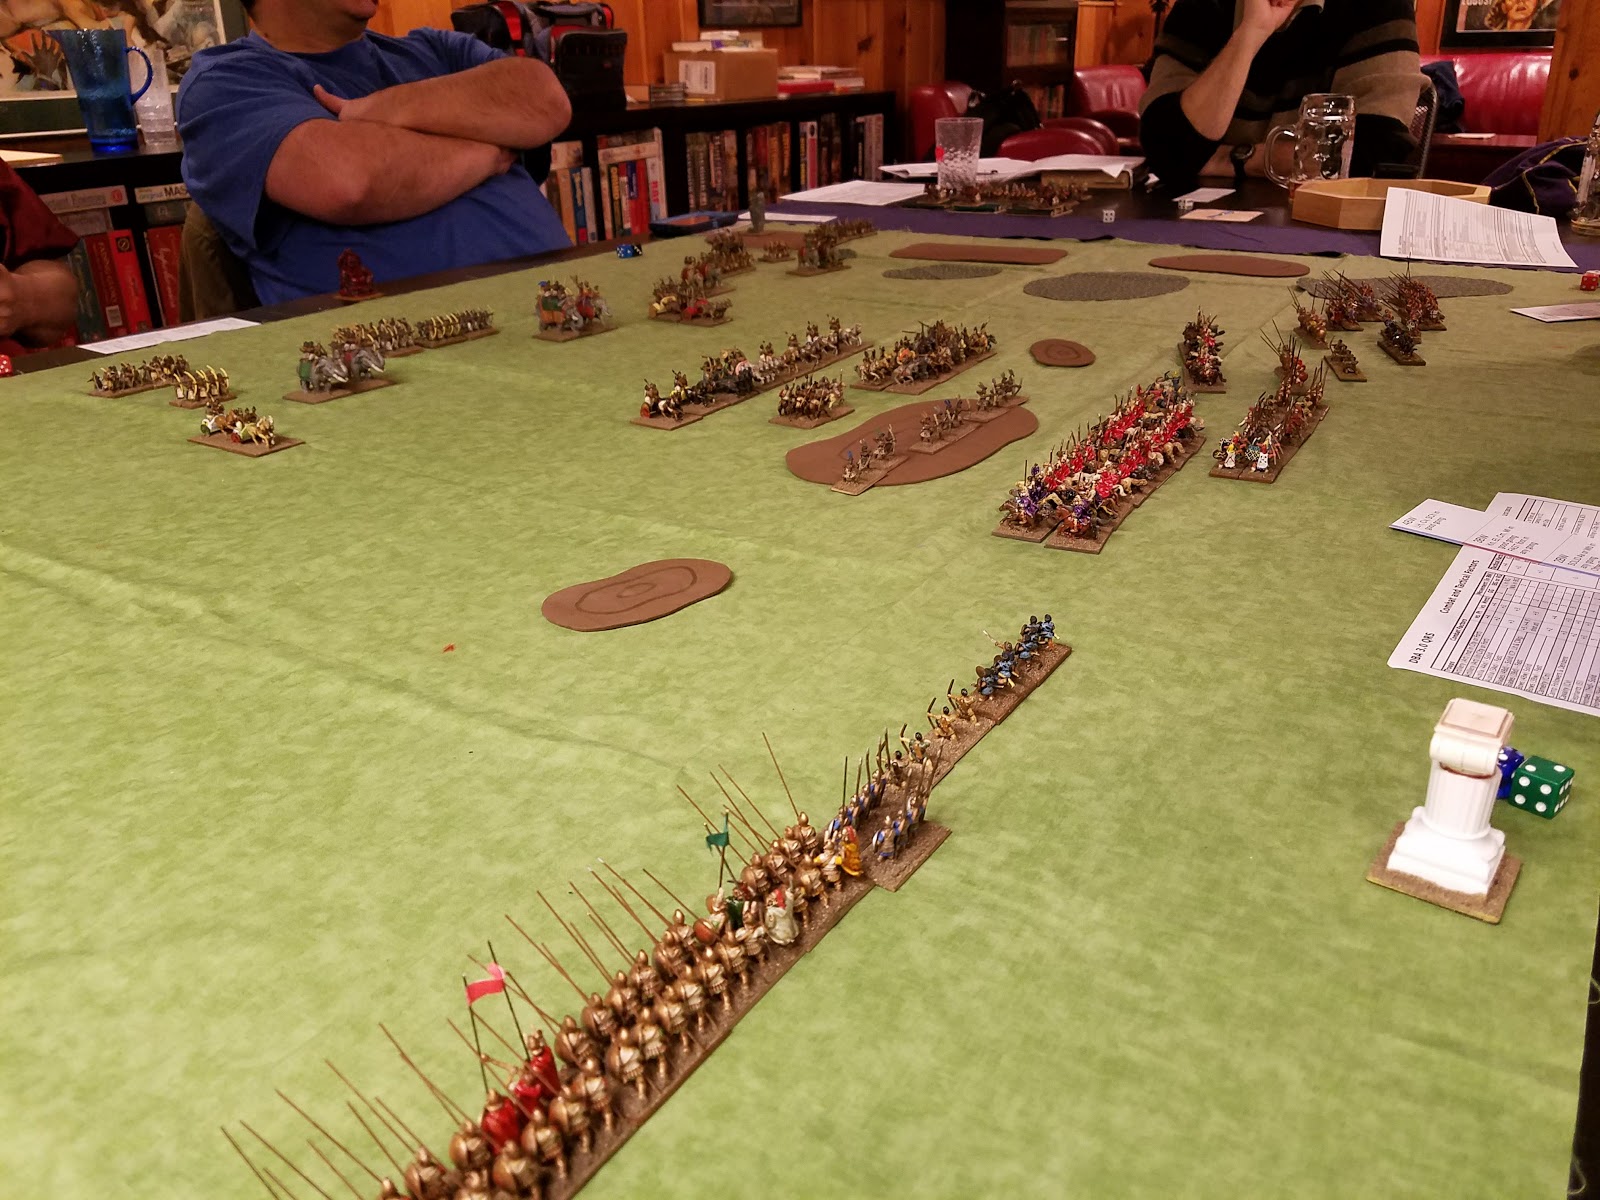
Dave put on a version of the Battle of the Hydaspes River, Alexander the Great's last great battle, last night. He used DBA 3.0, with a few variations - no rolling for command pips was the biggest one. It ended ahistorically with an Indian victory, which is a pity as I played the left flank for the Macedonians.

Indian chariots and skirmishers dominate the battlefield to begin with...

Alexander's forces march on to the table.

The phalanx on the left flank. Two units of companions are shifting from the left to the center behind the phalanx line.

Alexander (the purple-caped cavalry) and his Companions bullying the Indian skirmishers off the hill.

Indian elephants lumbering toward the Macedonian left flank.

The Indian front line retreats from the Companions, but their main line approaches...

Indian skirmishers move through rough going, covering their elephants.

Treetop view of the battle from the Macedonian left. The left phalanx is shifting a bit to avoid being outflanked by the elephants. The Indian front line is bowing away from the Companions.

Indian front line is (mostly) driven off by the Companions. 

The elephants finally hit the Macedonian left flank, smashing into the skirmishers guarding the far left.

Indian line reforms and prepares for the second clash of arms.

Elephants drive the skirmishers back a bit...

... and have destroyed two stands. The phalanx will soon be outflanked. Also, this is when I realized that my phalanx was advancing on archers, not spearmen. Stupid straight bows...

Cavalry smashes into the spearmen, phalanx endures a rather ineffective volley of arrows, and the elephants move around to the rear of the phalanx.

Companions face off against the second line of infantry and elephants.

Overview of the unfolding disaster on the left flank. Note the lack of Macedonian skirmishers.

Overview near the end. In the far distance, the Macedonian reinforcements have crossed the Hydaspes and threaten the Indian left... but too late.


The end, at least as far the left flank is concerned - demoralized and fleeing past the elephants.


Sunday, March 6, 2016

Battle Report: Bear Yourselves Valiantly, Some Time in the Middle Ages

This one's a bit late, but on the 27th of February I got together with the gang at Guardian Games to play out a learning/test game of Bear Yourselves Valiantly, the fantasy/ancient/medieval rules set from the Look Sarge, No Charts guys. We weren't recreating any particular battle so much as testing out the rules, but from the disposition of the flags, it appears a Pope had a beef with an Emperor, or possibly the other way 'round.

In any case, we had six players with Alyssa running the game. She'll be using it to run the Battle of Watling Street at Enfilade this year, so this was something of a test run. Victor stood around and provided helpful advice.

Things begin with an advance toward the hill...
I took the right wing of my side, with two battlegroups under my Wing Commander. In BYV, there's a fairly strict chain of command. Your army is composed of warbands, i.e., bases or stands, which form a Battlegroup. These are in turn gathered together into Wings - usually three - which are all under your army commander. This matters for two reasons: Initiative and morale. I rather liked the initiative system - there's a deck of cards containing two sets of 1-6 cards and a joker. Every commander on the table rolls a d6 for their initiative number, then the GM starts drawing cards from the deck. Commanders (and their battlegroups) act on the card corresponding to their number. On a joker draw, the round ends. Thus, a battlegroup might act once, twice, or not at all.

Morale-wise, after this game, I think it's important for the game to have more smaller battlegroups rather than one or two large ones. More on that later.

In any case, the game proceeded mostly as these group games usually do: a series of one-on-one conflicts with a little overlap at the margins of command. On the left, my side did fairly well, pushing the Imperial forces back. In the center, things turned into a vicious slog over a prominent hill. And on the right, things went absolutely to hell pretty quickly.

Enemy forces advance up the hill; my cavalry waits for David's infantry to get into a good charge range.

The view from the Pope's Bastard Son, leading the right wing.

Enemy cavalry takes the hill

The Bastard Son taking a look at his left - he's sent three warbands around the wood to help contest the near hill.

Things are going badly...
 Things were going fairly well until the first clash of arms. Every time a stand takes a hit, if I recall correctly, their battlegroup commander gets a Morale Test token. At the battlegroup's next activation, the commander must take a test for every token on him, needing to roll higher on a d10 than his Morale Value. Should he fail, the entire battlegroup may suffer a result, from OK to a Rout. I managed to suffer a Rout on my first morale test, and suddenly the right half my wing was in mad retreat, as seen above.

The slog in the middle. Note the green initiative dice on the commander stands.

My Routing battlegroup, screened from the enemy by the woods and their more valiant comrades.
 After routing, units will continue to flee - though they needn't head directly for the board edge - until they are either 24" from any enemy units, or they have interposed rough going or friendly units between themselves and any enemy units. As the picture above shows, I was able to swing the wing commander's own battlegroup into position to buy some time. So, now my battlegroup wasn't in Rout; they were Pinned. We all agreed that this was an unfortunate term, as a Pinned battlegroup can still fight and maneuver normally. It only suffers a -2 to any combat rolls (which is quite, quite bad). It can also only activate on a black card, instead of both a black and red card.

Things are going much better on the other end of the field.

Enemy forces send off the screening units, and the pinned battlegroup turns to face. The Bastard Son is about to eat a charge from a covey of knights...

Some point late in the evening, near the end of the game. Now both battlegroups have been Pinned.
We called the game after about four and half hours of playtime. My side, things were mixed - both of my battlegroups were Pinned, and I was pushed very near the board edge. But on the other end of the table, the Bastard Son's hated rival was doing quite well...

As for Bear Yourselves Valiantly - I think I might like it. Like most rules sets, it could be written somewhat more clearly, and we had several questions after the game, mostly about charge reactions and the effect of having one warband directly behind a friendly warband. The authors are quite responsive to questions, though, and responded to Victor quickly. I really like the d10 + special dice mechanic. It's not amazingly granular, but it's very quick and gives pleasing results.

The two things that appear to require special care are army organization and the Morale Values given to troops. As I experienced above, one bad or two bad morale rolls and you can have essentially lost the battle. Having more and smaller battlegroups mitigates this a bit. Morale Values seem to need to be surprisingly low - the lower the better in game terms, and since your battlegroup commanders will be taking quite a few Morale tests, even a 3 is dangerously high. (That's a 30% chance of failure, and on a failure you have something like a 1 in 3 chance of routing or being pinned.) Recovering from Pinned status requires rolling a 6 on your initiative die, so in a game that may only last another three rounds, it's pretty unlikely.

Still, those aren't flaws with the system as such, but things that game referees need to keep in mind. So, I'd give this system a solid B, maybe a B+, and I'd definitely play it again.