Showing posts with label 15mm. Show all posts

Sunday, February 9, 2020

Early February: Gaming and Painting

Yesterday, I played my second round of Adeptus Titanicus against Dan, and then headed over to Andrew's for a bit of AK-47 Republic, a game of late 20th-century warfare in Africa.

Deployment; my Warlord stands proud in the foreground.

Near the end; I've traded my Warhounds for his knights and one Warhound. (Not a good trade) My Reaver's pretty beat up, too.

End of the game; my Warlord has just detonated spectacularly, taking the Warhound on the far left with it.

A UN medical convoy with escort enters a town stricken with ebola...

... but is attacked by militia controlled by a local warlord. Fighting in the town is intense...

... but the convoy is lost, though most of the relief workers survive and are picked up later. Fighting is inconclusive; the UN force retreats after badly bloodying the warlord's forces. Nobody wins...

And today, I finished up a couple Grymkin models. Almost done!
Zevanna Agha (left) and twenty Dread Rots (right)

Monday, January 28, 2019

Weekend Report

This past weekend saw a nice bit of gaming: the monthly Saga get together, a game at Andrew's, and a trek through a very foggy Portland to play some Warmachine at Rune & Board.

Saga: Normans v. Normans!

I figured I'd play my Crusaders as Normans this weekend, as everyone else is playing Age of Vikings and the figures are close enough. Dropped into Bob's (better-painted, better organized) Normans and pulled out a very bloody draw.

Deployment. My knights on each flank, crossbows, longbows, and spearmen in the center. Bob has two full levy longbow and three fat units of mounted warriors waiting for me.

Some initial shuffling on both sides; I backed out of longbow range, which was probably a mistake. Should have pushed more aggressively.

A scrum on the right results in horrible casualties; I lose four knights to seven of his serjeants. While I can't afford to lose a lot of men, at least I take away a Saga die from him.

Finally, I start pushing up. My archers kill a bunch of his central levy unit, while my sole remaining knight on the right bravely rides away. Over on the left, my knights are suffering bowshot.

Longbows reduce his center levy to under Saga die level, while my spearmen rush the other archers...

And a bit later, at end of game, we see that my spearmen were run down by the rightmost mounted serjeant unit. What unit, you ask? Why, the one I dedicated all my shooting to and then used my Warlord to finish off. Had this game gone another turn, I think Bob would have carried it with those undamaged warriors on the left, though....

Russian Civil War: What's Red and White all over?

Nothin' civil 'bout a civil war... This was a test game Harry's running for Enfilade, so I'll try not to spoil any surprises, but it was pretty fun. We've got the Reds straddling a railroad trying to capture a VIP on the armored train. Lots of cavalry, some armored cars and tachankas, and a rather quick-moving system (1914, by Great Escape Games). I ended up as high command on the Red side, which, as any student of the Soviet Union can tell you, is a rather dangerous spot to be in. (Nonetheless, we won...)

Table layout prior to deployment.

Brave Revolutionary naval artillerymen.

My cavalry pushing up the field....

The train approaches!


Though the front (artillery) car is disabled, the train chugs on... oblivious to the cavalry scrum on the line.

Game end, more or less.... my center and left are just about broken, but the train has been stopped...
 The system wasn't bad at all. I'm not sure it's suited to a convention, but it moved quickly and we started getting into combat right away, and the results didn't tweak my suspension of disbelief. I'd play it again.

The mat and tracks, btw, are apparently from Cigar Box.

Masters' League Game: Grymkin vs. Skorne

After much scheduling hassle, I was able to get the first game in our local Masters' League (think tournament, but stretched out over a month) in at Rune & Board with Jeremiah. He brought a Xekaar beast brick, a classic titan herd; I brought the Wanderer with my own beast brick. He won the roll and opted to go first.

As this was Jeremiah's second or maybe third game with this list, he managed to clock himself top of three, giving a result of (if I recall correctly), 2 control points and 17 army points for me, 3 control points and 9 army points for me. (I failed to write it down quickly, so that may well be off.) We then played out the rest of the game off the clock, and I won with an assassination. As usual with Wanderer, it's all Star-Crossed for the money and not much else. So, pictures!

Xekaar's second turn just beginning.

Beginning of Xekaar's third turn.

End of game by clock; Xekaar on the left hiding behind a building. I've used the Shadow Arcana over on the right with the red Cage Rager. One thing that isn't obvious is that Xekaar has cunningly applied Dead Weight to the center Skin and Moans.

End of game by assassination. The center S&M was able to kill off the blocking Titan Gladiator, and then the left-hand S&M walked around the building and just chopped up Xekaar. Over on the right we see the effects of the Shadow arcana - very cold dice meant that Cage Rager accomplished nothing.

Monday, February 19, 2018

Terrain Evaluation Time: Trees and Water

Ringing in my fifth decade with my first case of strep throat, so that gives me plenty of time to contemplate wargaming. In this case, terrain! Like a lot of gamers, I've focused almost all of my time on the figures, and collected a hodge podge of terrain pieces over the decades. It's time to change that, and the first step was to evaluate the terrain I already have and compare it to the scales I'm planning to use for gaming. 

After digging in the basement, I found that I had more trees than I thought, a few water pieces, and one old GW hill. I also had a fair number of buildings in varying stages of completion and painting, but more on those another day. I've resolved, and have mostly stuck with, gaming in only three scales: 6mm (aka 1:300 or 1:285, depending on the line), 15mm (1:100ish), and 28mm or 30mm (1:56 to 1:60 or so).

First, a look at the trees. I have three types: old GW, a bag of HO (1:87) model railroad conifers, and some Frontline Gaming conifers (their "summer tree" set).

6mm Napoleonic Cavalry, a 3-story building, and some GHQ microarmor next to the HO scale trees.

15mm figures next to the HO trees and the GW trees (far left and right). A Plastic Soldier Company StuG G and some Battlefront infantry and truck.

15mm ancients with the HO and GW. Essex slingers and I believe Old Glory15s Gallic cavalry. The bases are 40mm wide.

15mm ancients in among the Frontline Gaming trees.

Same as above, but giving some vertical scale.

Privateer Press 30mm Hordes Grymkin figures next to the GW and HO trees. The three models in front are standard human-sized.

Grymkin in the FLG woods.

28mm Frostgrave and Gripping Beast Crusader figures among the FLG woods.

And next to the HO and GW trees.
I'm pleasantly surprised. I'd have thought the older trees, the GW and HO ones, were writeoffs, but they don't look half bad. The HO ones will probably work ok with 6mm as old growth forest giants, while the GW ones are... acceptable. They do look a bit much like toilet scrubbing brushes for my taste, but they'll do until they get replaced with better looking kit. I need to make some area bases for stands, copses, and groves. I'd also like to get some deciduous trees, and some stuff that'll do for dense brush - brambles and the like. And, of course, some orchard trees.

One quibble I have with most wargaming trees is that they're far too short, usually for reasons of playability and practicality. On average, I think they're between 5" and 10" - in 28mm, that theoretically puts them between 24' and 48'. A respectable Douglas fir easily doubles that, but then you're dealing with 20" tall trees on the table. It's one reason I've grown fonder of smaller scales like 15mm and 6mm; you can show more of that height. The 5" tree in 15mm appears to be a good 50' tall in scale. That's a point I'll come back to when I get to hills someday...

After the trees, I took stock of my water supply: Two sets of rivers and a swamp from Wizard Kraft, and streams and swamps from Gale Force 9's Battlefield in a Box line.

6mm on the banks of a Wizard Kraft 4" river, with the GF9 stream in the back.

15mm WW2 on the GF9 stream, with the GF9 swamp behind and the Wizard Kraft swamp to the fore.

15mm ancients.

30mm Hordes figures; again, the three short models are human-sized.

28mm Frostgrave and Gripping Beast.
By the look of it, either line will do will, but I'll probably go with the GF9 stuff for now, simply because it is more easily available (and, I suspect, will hold up to rougher handling at the FLGS). On the other hand, the lower profile of the Wizard Kraft stuff is a much better fit for the 6mm figures, and I think it looks better to boot. Either way, I need to pick up some more ponds, narrow streams, and crossing points.

Lastly, few random pieces:
GF9 "Rock Outcrops"

These are nice for some scatter obstruction, but they also seem a bit fantastic, in that I'm not sure what sort of terrain you could expect to see rock outcrops like these naturally appearing in. Maybe a rugged mountain pass? They're definitely not well-scaled for 6mm figures, but they'll do all right for my other scales.

One last note: All these were laid out on a Cigar Box battlemat, and I'm quite pleased with that piece of terrain. It drapes very nicely and doesn't scatter bits of flock all over the place...

Tuesday, February 13, 2018

Romans vs Seleucids in To The Strongest!

Last Saturday saw me throwing another phalanx vs. legion bash for the guys, this time using the To the Strongest! rules from Simon Miller. We called it before the real end of things, but it seemed to be drifting toward a victory for the phalanx... in no small part to the Roman left-flank player's appalling luck. I've never seen one roll so many ones, so to speak.

Early moments: The Seleucid right advances, while the Romans move forward a little more cautiously.
 We started things off rather farther apart than most games of TtS recommend; this gave the players time to get the hang activations, group moves, and march moves.

Just before the clash.
 The above picture shows off all the lance (blue), shock (green) and ammo (brown) tokens this game needs. I'm going to need to order some more if I want to run some bigger games...

Camelry in the foreground, Seleucid lancers and Roman triarii in the middle.
 While the two sides were point-balanced, the Seleucids had a really cavalry advantage, and I think that might be a bit of a problem in scenario design. Not sure yet how to address it.

The Romans stand off behind their velites.
 I also think I erred in a couple things - for one, on a closer reading of the rules, units can't activate to shoot if they're in an enemy zone of control. That means that the only way javelin-armed troops can shoot is either from one side, or by moving and shooting in the same activation.
The Roman left flank has all but disintegrated, leaving the legion open to a sweeping flanking move from Seleucid cavalry.
Still, fun was had by all, and though I felt things might have been dragging a bit halfway through, I do like the rules.

Sunday, January 29, 2017

Battle Report: Battle of the Hydaspes River

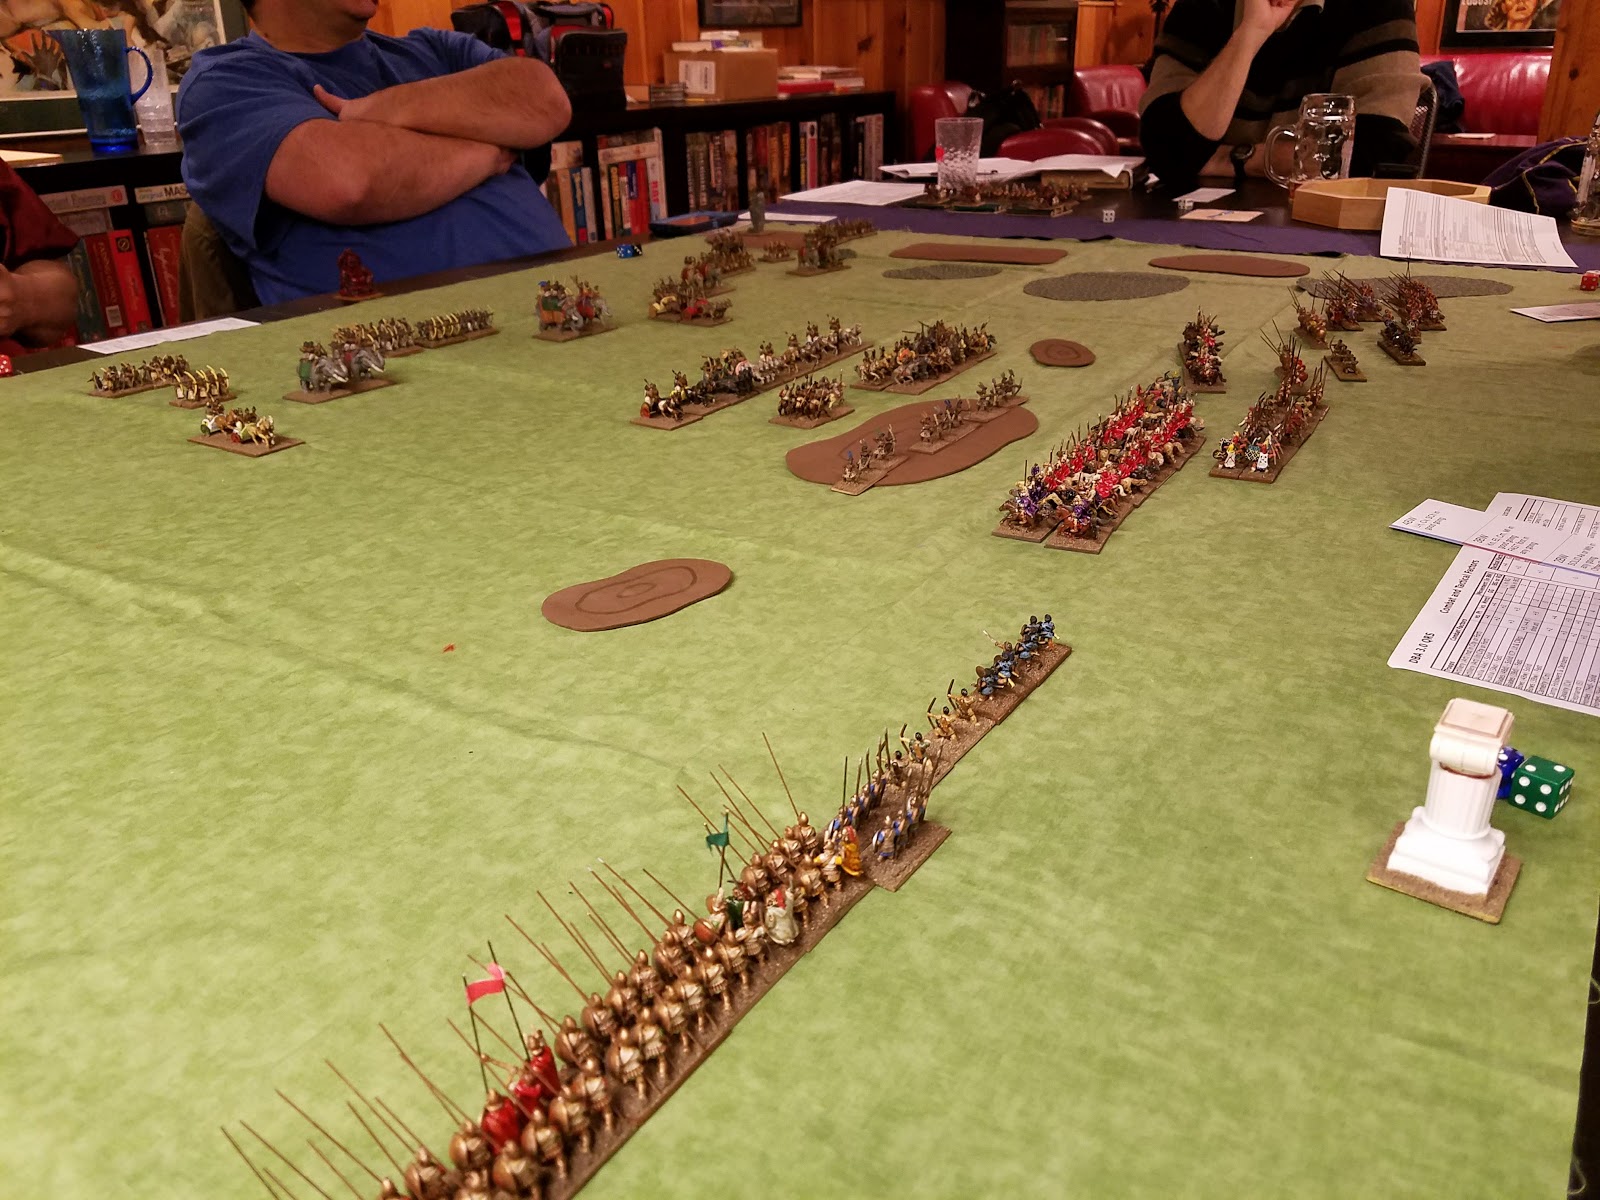
Dave put on a version of the Battle of the Hydaspes River, Alexander the Great's last great battle, last night. He used DBA 3.0, with a few variations - no rolling for command pips was the biggest one. It ended ahistorically with an Indian victory, which is a pity as I played the left flank for the Macedonians.

Indian chariots and skirmishers dominate the battlefield to begin with...

Alexander's forces march on to the table.

The phalanx on the left flank. Two units of companions are shifting from the left to the center behind the phalanx line.

Alexander (the purple-caped cavalry) and his Companions bullying the Indian skirmishers off the hill.

Indian elephants lumbering toward the Macedonian left flank.

The Indian front line retreats from the Companions, but their main line approaches...

Indian skirmishers move through rough going, covering their elephants.

Treetop view of the battle from the Macedonian left. The left phalanx is shifting a bit to avoid being outflanked by the elephants. The Indian front line is bowing away from the Companions.

Indian front line is (mostly) driven off by the Companions. 

The elephants finally hit the Macedonian left flank, smashing into the skirmishers guarding the far left.

Indian line reforms and prepares for the second clash of arms.

Elephants drive the skirmishers back a bit...

... and have destroyed two stands. The phalanx will soon be outflanked. Also, this is when I realized that my phalanx was advancing on archers, not spearmen. Stupid straight bows...

Cavalry smashes into the spearmen, phalanx endures a rather ineffective volley of arrows, and the elephants move around to the rear of the phalanx.

Companions face off against the second line of infantry and elephants.

Overview of the unfolding disaster on the left flank. Note the lack of Macedonian skirmishers.

Overview near the end. In the far distance, the Macedonian reinforcements have crossed the Hydaspes and threaten the Indian left... but too late.


The end, at least as far the left flank is concerned - demoralized and fleeing past the elephants.