Showing posts with label Napoleonics. Show all posts

Saturday, January 12, 2019

Game Night: Black Powder 2, Napoleonics

Gaming at Andrew's after a long hiatus! Pete put on a nice game of 100 Days French vs. Allied with classic 25mm figures, using the new version of the Black Powder rules. I was granted command of the French right, which included the Guard and a division of cavalry.

Thanks to some command failures on both sides, the game developed primarily on the flanks. On the French left, a wood blocked free movement and became the chief battlefield. In the center, French infantry moved slowly up toward the defensive positions the British had seized - some houses and walled fields. On the left, the British heavy cavalry - the legendary Scots Greys - pelted up and seized the initiative. They were quickly met with a charge of French heavy cavalry, which pushed them back. A subsequent charge from the French, however, cost the French one unit of heavy cav and badly bruised the second unit. The Guard meandered on up at a walk, their only contribution being some cannon fire. 

The central French infantry regiments pushed up and evicted the British light infantry from the walled field. Then the Scots charged forward and retook the field, and a ferocious scrum ensued, eventually ending when the Swiss pushed the Scots back and a French line unit annihilated the rifles.

Finally, the French infantry reached the Brunswickers and the Brits holding the defensive line. The light cavalry made a daring but foolhardy charge at the British heavy cav, and succeeded in breaking them - but in the process, were too damaged to stay on the field themselves. Both divisions began to retreat. The Guard began to move up, but it was too late. The French center-right division and far left division both broke as well, along with another British division, and so the game was decided - barely - in favor of the Allies.

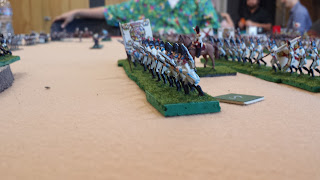
View from the French right of the advancing British and Brunswickers.

French cuirassiers and carabiniers charge at and are countercharged by the Scots Greys.

Turn 2ish, overview. Cavalry action on the French right near the camera, 95th Rifles in a field but disordered in the center, and the British left getting bogged down on terrain to the far right.

View of the French center.

Scots Greys retreat in good order, holding the British left. Behind the road and hedge the Brunswickers are awaiting the French.

Over on the French left, French line infantry skirmish with British line in the woods.

French heavy cavalry charge in on the Scots Greys again - but their supporting light cavalry failed the command roll, and so they must fight alone.

British cavalry charge in around the woods, braving French musket fire.


Checking for support in a cavalry melee on the French left.

The penultimate round: French infantry have pushed up the center but are held at bay by Scots and Brunswickers. On the French left, near the camera, skirmishing in the woods dominates the action, preventing the British from moving toward the French line. On the French right (top of photo), the Scots Greys have intimidated the French cavalry severely, destroying one unit, but have taken quite a bruising themselves.

The final state of things. The French are in retreat, half their divisions having broken. The Allies have fared only marginally better, but they hold the day.


Painting update

I'm about 1/3 of the way through the samurai. Been distracted by some D&D figures for a campaign that's just starting up...

Budget update

Spent about $30 out of my $100 budget so far, on primer and paints.

Sunday, January 28, 2018

Et sans Resultat! Napoleonic grand battle, and Saga report

2017 turned out not to be a great year for my gaming, almost entirely due to scheduling issues. I hope 2018 will be a bit better.

Last night, we did a test game of Et Sans Resultat! It's a grand battle game for the Napoleonic Wars, and to be honest probably a bit too fiddly for my taste. But it did look very pretty on the table, with rank after rank of 25mm redcoats and line infantry clashing in the middle. Here are some pictures:


My Brits advance up the board.

The entire battlefield... more or less. The house on the left represents my objective.

My left formation is beginning to deploy into line, while my right formation is struggling to get through some woods. To my right, Dave's British cavalry have attacked Andrew's French center.

French and British exchanging skirmish fire.

Much the same as before, save that both sides are getting quite fatigued. In the center, Dave's cavalry have beaten up a few French battalions. To the far right, Vic and Andy are mucking about.

Before that, I hit the monthly Saga day at Guardian and got a couple games in; both victories for me, but both only as a result of Hail Mary plays, so I can't really chalk that up to strategic acumen.

First we had defend the homestead from the Viking Age rulebook:
My Crusaders defend a few ruined buildings from Anglo-Saxon marauders.

Had to trade 8 knights to eliminate a single unit of Anglo-Saxon warriors. This is not a good trade.
That game ended with me rushing my last group of (dismounted) knights up and just managing to kill the enemy Warlord for a victory before he was able to kill off my own remaining mounted troops.

We reracked and did a Last Stand game. This time I was the attacker, and only had six turns to eliminate all of his troops. That turned out to be barely enough time.
After my first turn: Anglo-Saxons huddled in the center, my troops have just moved on.


I charged in with my Warlord and knights on the right and eliminated a small unit of Anglo-Saxon Hearthguard at a cost of four knights. (This happened every time my knights charged in today - lost four knights every time.)


That, it turns out, was a mistake; as the photo shows, my Warlord is now gone and he won't be coming back. I did manage to pick off most of a unit of warriors on the left, though.

Just before the end. Only two Anglo-Saxons left beside their Warlord, and I disposed of them pretty quickly - and just in time, too! 

Wednesday, September 21, 2016

Napoleonic Shako game and Khurasan Fantasy figures

A belated quicky:

I played the French right flank in a Peninsular game versus the perfidious Spaniards the other day, using the classic Shako rules and 1/72 (or 20mm) figures. Good fun, though my flank was rather badly used by the Spanish - the French dragoons were run off by their counterparts, which seems terribly unfair to the victors of Austerlitz.


Most of my time recently has been spent painting up some Khurasan 15mm fantasy figures for a friend. I'm quite happy with the results:


Coming soonish: A Republican Roman legion I've been working on, more Napoleonics, and perhaps some Saga or Warmachine stuff.

Wednesday, August 3, 2016

Painting - and Gaming - Update, July 2016

I've been rather terrible at updating the blog, but I've been keeping busy regardless.

On the painting front, I've finished some Perry Brothers samurai, and some Hordes models.

Perry Brothers spear and bow ashigaru, and one errant samurai.

Back row: two Efaarit Scouts. Front row: Lanyssa Ryssyl (L) and Alten Ashley (R)
Painting the Efaarit Scouts was a real pleasure. They're very well done models.

L to R: Wold Wyrd, Tanith the Feral Song, Baldur the Stonecleaver, Wild Argus

Gaming wise, I've been playing in the local Journeyman League for Warmachine & Hordes, and enjoying it a fair bit. I'm very much enjoying the Circle Orboros playstyle, and so far I'm having a good experience with the Mark III rules. Sadly, no pics of this...

But I am getting some more historical stuff in. I did a demo of Blucher at the last Portland Historical Wargames day, which was nice and portable using cards and flat terrain. Someday, I'll get on with rebasing and painting all my 6mm figures for it...


Technically in June, I played a biggish Gaugamela refight as seen below, using the Armati system. (At least, I think it was Gaugamela.)

Deployment

Lines advancing

Elephant-eye view!

Oooh, that's a lot of casualties. (That's Darius on the chariot in the back.)
This one went contrary to history, with a Persian victory - and most notably, Alexander's capture by Persian horsemen midway through the fight! No "the Great" in this battle's timeline...

Sunday, September 27, 2015

Marshal Ney's death at Quatre Bras - Black Powder AAR

This past Saturday I had the pleasure of playing in a refight of Quatre Bras using the Black Powder rules, plus the Contemptible Little Wargame Club house rules. Alyssa organized and hosted the game at Guardian Games, and provided quite a few figures...

Quatre Bras, occupied by troops under the Prince of Orange.
I took up command of the 2nd Netherlands Division, 1st Brigade (more or less - logistics dictated that not all battalions present at the battle actually appeared on the table), and occupied Quatre Bras itself. To my right, the bulk of the Allied force faced off against the oncoming French west of Quatre Bras.

Allied Forces holding the intersection, Prince of Orange nearby.

The French outnumbered the Allies badly, so our mission was simply to hold until our reinforcements could arrive. The first to arrive were the Brunswickers, who, well, had some command and control issues and came on rather slowly (failed command rolls two turns in a row).

French forces approaching Quatre Bras from the southeast.
The French attacked with considerable boldness from the southeast, pushing cavalry charges ahead to assault the defenders of the town. Unfortunately for l'Empreur, Ney attached to the first of these, and perished in a devastating countercharge from the Brunswick cavalry.

First wave of British reinforcements march into Quatre Bras.
French Cavalry charging in; Dutch line infantry form square, while the Brunswick cavalry are caught in column.

Successive French charges into Quatre Bras were repulsed, and the situation became static.

Gunnery duel in the fields of Quatre Bras. Dutch troops hold the wall while the Highlanders attempt to storm the French guns. French troops hold the hill opposite.

Final position. The French have effectively lost the firefight and their eastern flank is deeply imperiled.

As we drew to a close after a good seven hours of play, the Allies held Quatre Bras and - despite the French finally routing the western flank - would probably be able to hold it indefinitely.

On the whole, it was a lot of fun. Alyssa had things nicely organized, and I continue to like the Black Powder rules as a playable system.

Sunday, June 21, 2015

Hougomont in Napoleon at War

Yesterday I had the pleasure of attending a Waterloo refight at Haven Gaming in Salem. Well, due to some confusion in the arrangements, it turned out to be separate refights of Hougomont and Ney's cavalry charge on separate tables. I took command of the French light infantry assaulting the British position at Hougomont.

The game was Napoleon At War, my first time playing it, and this scenario was drawn from the Hundred Days supplement. We used plastic 1/72 figures from several manufacturers, I think. (I painted one battalion for the organizers, and my take away is that I'm fine with the scale but detest the soft plastic material.)


French light infantry deployed in attack column in the foreground.
We deployed as we chose, French first. The British deployed with one battalion holding the farmhouse, the Nassau battalion holding the wall, and another battalion to their left in the woods. (The treeline in the photo above represents the edge of the woods, which extend back to the British table edge.) I deployed my six battalions with three in attack column to move up to the Hougomont, two on the right flank in line to prevent any outflanking, and one just behind in attack column to act as a reserve.

French advance. Leftmost battalion has taken the house.
The first two turns went swimmingly for the French; the leftmost battalion performed valiantly and stormed the farmhouse, destroying the occupying British battalion. In the center, I advanced more cautiously; on the right, advanced to exchange fire with the Allied troops in the woods.

Same table state as above, different view.
British reserves trickled on throughout the game, but did not get into action until turn five and six.

Turn four...
By turn four, the French light infantry had two battalions, one at full strength, occupying the farmhouse. An initial assault on the Nassau troops behind the wall had failed, but they now faced three battalions in attack column. Meanwhile, the battalion on the right had inflicted a nasty blow to their opponents, who had fallen back in good order, and took up position behind the wall.

Battle's end.
At last the line infantry came up from the French reserve. The three battalions opposing the Nassau troops assaulted, but the Nassau troops held the wall and nearly destroyed their attackers. In the farm compound, one Landwehr battalion was able to move into position to assault the French defenders... but they got cold feet at the last moment and the assault faltered.

The final result: a reversal of history, as the French gained a foothold in Hougomont from which they could not be dislodged.

As to the game, I found it rather nice. It played quickly; with both the French and British commanders completely new to the rules, we finished the game in about two hours (with considerable help from two experienced players acting as referees). It's been said that Napoleon at War is "Flames of War: Napoleonics" and that really rings true. It plays faster than FoW, though, and seems less fiddly. I liked it, though I thought the basing was maybe not to my taste.

Congrats and thanks to Oliver and the Wargames Oregon crew for setting this up and running it, and thanks to Haven Games for hosting it.